Have you ever wondered why your face looks great in the mirror but strange in photos? In most cases, the problem isn't your appearance — it's a set of common beauty mistakes in photography that can be easily avoided with proper preparation.
Cameras amplify details that the human eye naturally ignores. Skin texture, uneven tone, harsh makeup lines, and lighting errors can all make a face look less flattering on camera than in real life. The good news is that understanding these differences allows you to prepare strategically for photo-ready skin and makeup.
In this guide, we'll explore the most frequent face and beauty mistakes in photos and explain how to avoid them for a natural, balanced, and confident look that translates beautifully on camera.
Key Takeaways
- Cameras capture texture and color with technical precision that reveals details invisible to human eyes
- Proper skin preparation 24 hours before a shoot is more important than heavy makeup
- Excessive shine photographs as bright hotspots — strategically mattify T-zone while keeping some luminosity
- Use color correctors before foundation to neutralize uneven skin tone that cameras amplify
- Light, well-blended foundation looks natural; heavy coverage appears mask-like in photos
- Subtle contouring works better than dramatic Instagram-style techniques in professional photography
- Balance eye and lip makeup — emphasize one feature, not both equally
- Facial tension is instantly visible in photos — practice conscious muscle relaxation
- Adapt makeup intensity to camera distance and lighting conditions
- Enhance natural features rather than attempting to create a completely different face
Why Faces Look Different on Camera
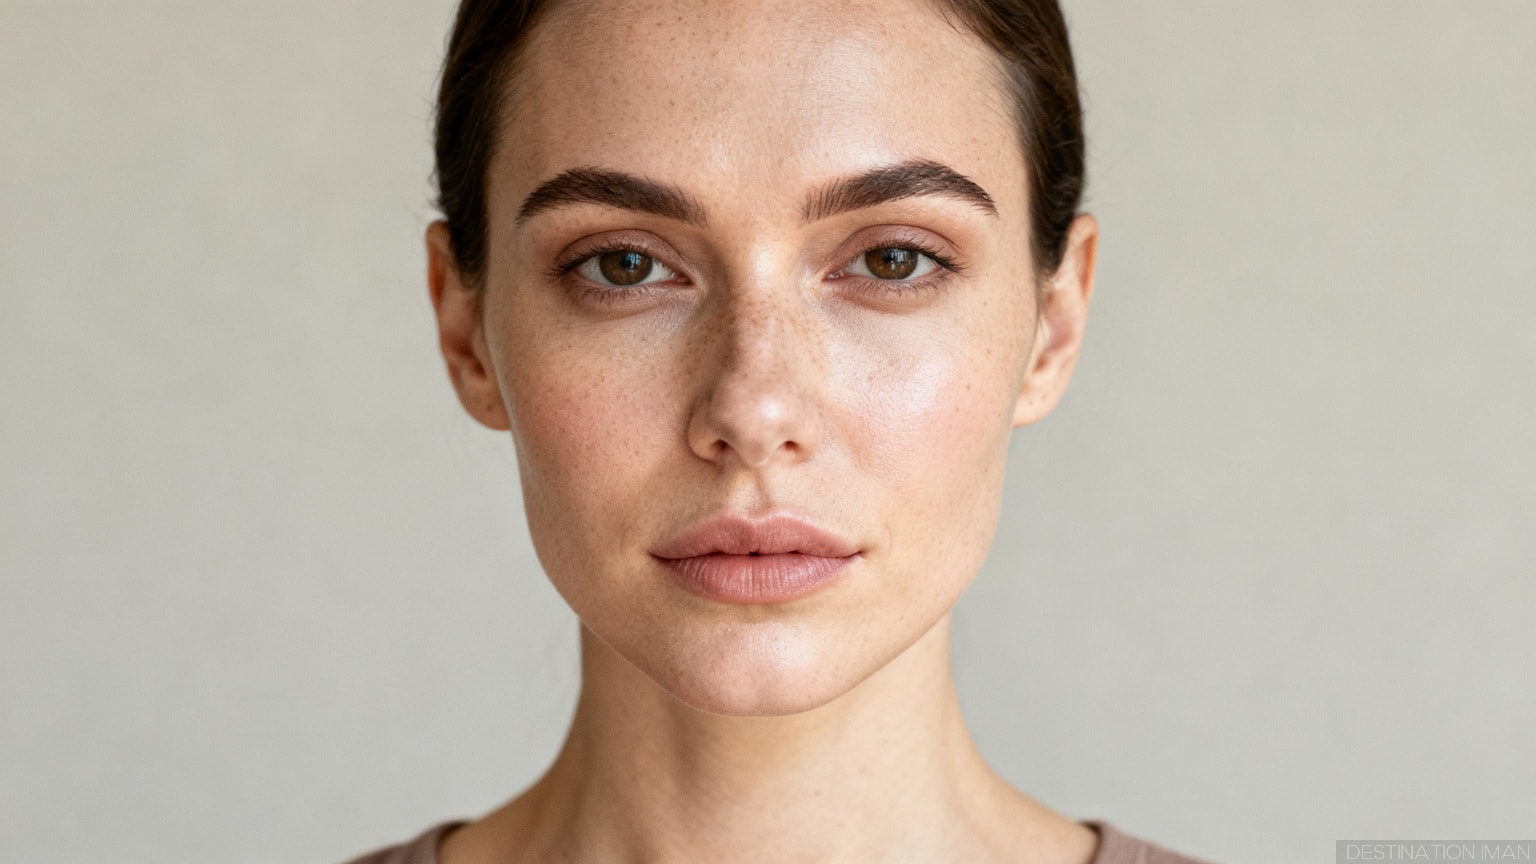
Photography is fundamentally different from how we normally see ourselves. When you look in a mirror, your brain processes a three-dimensional moving image with forgiving lighting and familiar angles. Cameras, however, capture a single frozen moment with technical precision that reveals details invisible to the casual observer.
Lenses flatten depth, removing the natural dimensionality of your face. Studio lighting exaggerates shadows and highlights in ways that standard room lighting doesn't. High-resolution sensors capture micro-details — every pore, every fine line, every subtle color variation — with unforgiving clarity.
This technical reality means:
- Uneven skin tone becomes more visible — redness, dark circles, and discoloration that blend naturally in person stand out in photos
- Makeup application errors are magnified — harsh lines, unblended edges, and color mismatches become obvious
- Shine and dryness are amplified — reflective areas create hotspots while dry patches look flaky and textured
- Facial asymmetry appears stronger — natural differences between the two sides of your face become more noticeable
- Texture is enhanced — pores, fine lines, and skin irregularities are captured with precision
Understanding these effects helps you prepare your face correctly before a photoshoot. The goal isn't to create a mask or hide your natural features — it's to present your face in a way that cameras can capture accurately and flatteringly.

Skin Preparation Mistakes
The foundation of photo-ready beauty isn't makeup — it's properly prepared skin. Many people skip this crucial step and wonder why their makeup doesn't photograph well. The truth is that makeup can only enhance what's already there; it cannot fix fundamental skin preparation issues.
Ignoring Skin Preparation
Dry patches, excess oil, rough texture, and dehydrated skin are all magnified dramatically by studio lighting and camera sensors. What feels fine to the touch may photograph terribly because cameras capture light reflection and texture in ways your eyes don't.
Why this happens: Most people prepare their skin the same way for photos as they do for daily life. However, cameras require different preparation because they're far more sensitive to texture and light reflection than human perception.
The fix: Begin skin preparation at least 24 hours before an important photoshoot:
- Exfoliate gently the day before to remove dead skin cells without causing redness
- Deep hydrate overnight with a nourishing mask or treatment
- On shoot day, cleanse thoroughly to remove any residue
- Apply a lightweight moisturizer and allow it to absorb completely (15-20 minutes) before makeup
- Use a primer appropriate for your skin type to create a smooth base
Professional makeup artists always insist on this preparation because they know that good makeup application depends entirely on properly prepared skin.
Excessive Shine
While dewy, luminous skin is beautiful in person, excessive shine photographs poorly. Glossy areas reflect light unevenly, creating bright hotspots on the forehead, nose, cheeks, and chin that draw attention away from your features and can even create exposure problems in the photo.
Why this happens: Studio lights and camera flashes are far brighter than typical lighting. Even moderately oily skin becomes mirror-like under these conditions, reflecting light directly into the lens.
The fix: Balance matte and luminous areas strategically:
- Lightly mattify the T-zone (forehead, nose, chin) where shine is most problematic
- Keep cheekbones and under-eyes slightly luminous for dimension
- Use blotting papers between shots rather than adding more powder
- Choose a setting powder with soft-focus properties that diffuses rather than blocks all shine
- Avoid shimmer products on areas that naturally produce oil
The goal is healthy-looking skin, not a completely flat matte finish. Strategic mattifying prevents problematic shine while maintaining natural dimension.
Makeup Application Errors
Makeup that looks perfect in your bathroom mirror can photograph terribly. The difference comes down to lighting conditions, camera sensitivity, and application technique. Understanding how cameras see makeup allows you to adjust your technique for photo-appropriate results.
Uneven Skin Tone
One of the most common beauty mistakes in photography is ignoring skin tone correction. Redness around the nose, dark circles under the eyes, hyperpigmentation, and general color inconsistencies become far more noticeable on camera than they appear in the mirror.
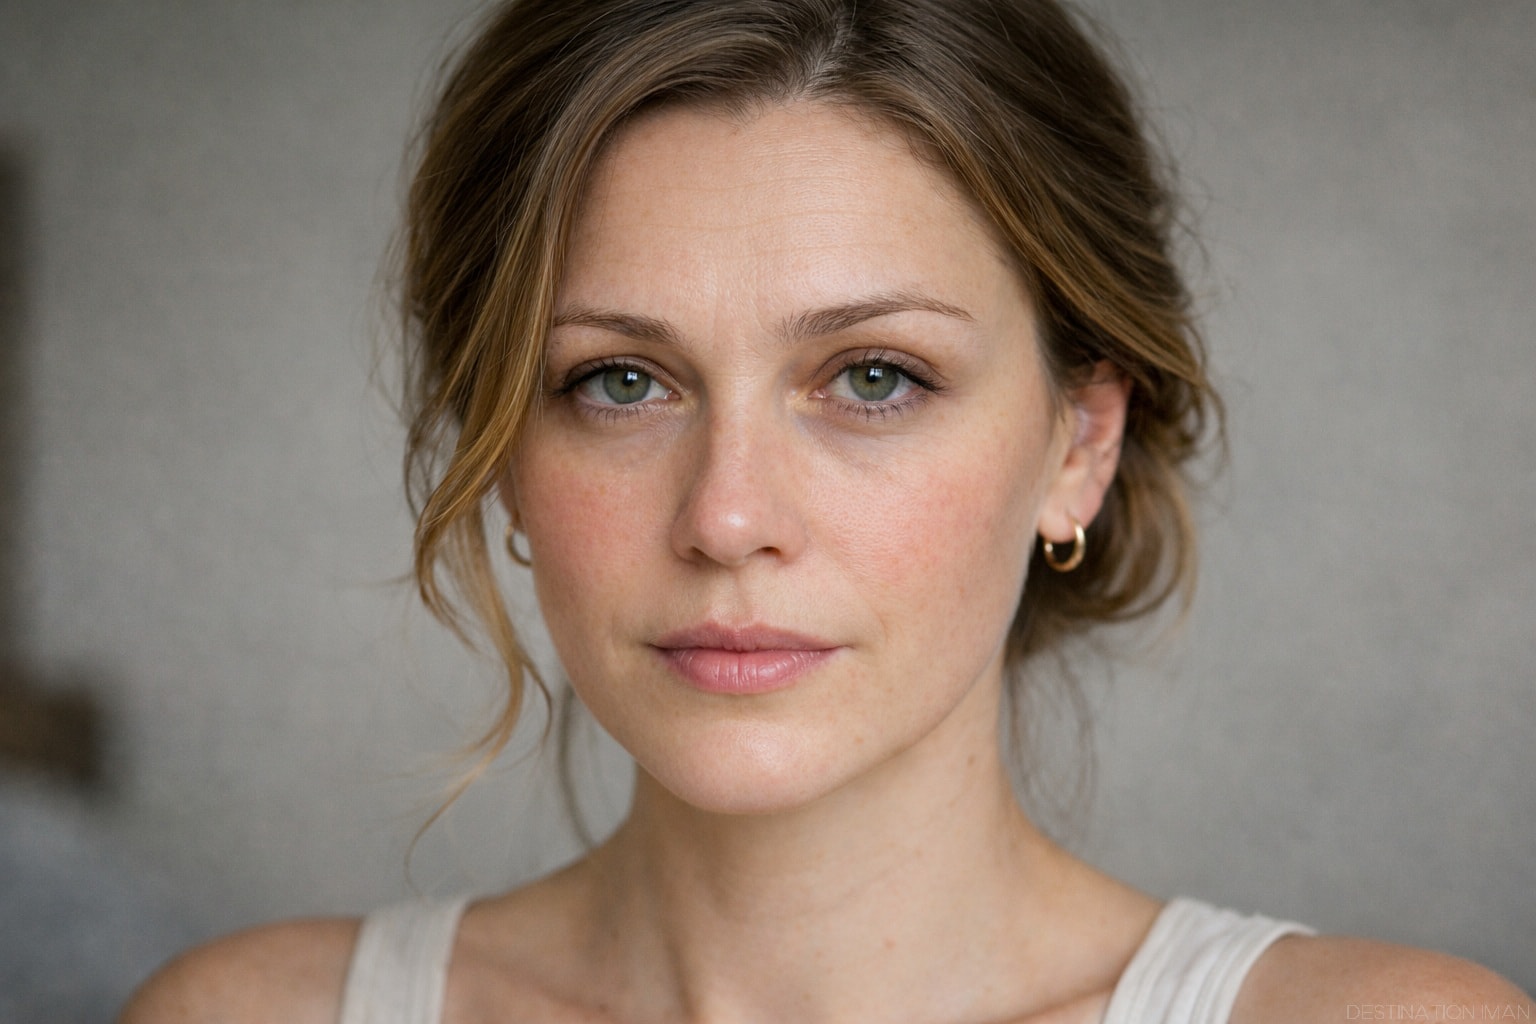
Why this happens: Your brain automatically adjusts for color variations when looking in a mirror, essentially "normalizing" what you see. Cameras capture exactly what's there without any mental correction, revealing every subtle color difference.
The fix: Use color-correcting products strategically before foundation:
- Green corrector for redness — apply to areas around the nose, chin, and any blemishes
- Peach or yellow corrector for dark circles — choose peach for fair to medium skin, yellow for deeper tones
- Lilac corrector to brighten dull, sallow skin — use sparingly on areas that lack vibrancy
- Blend thoroughly before applying foundation so correctors don't create visible color patches
- Use light layers — multiple thin layers work better than one heavy application
Color correction is not about covering everything — it's about neutralizing extreme color variations so your foundation can create an even base without heavy coverage.
Too Much Foundation
Heavy foundation may look smooth and flawless in person, but it often photographs as mask-like, artificial, and cakey. Cameras exaggerate texture, making thick layers of product look cracked, settled into fine lines, or visibly separated from the skin.

Why this happens: Foundation that looks invisible in soft bathroom lighting becomes obvious under bright studio lights. The contrast between makeup and bare skin (especially around the jawline and hairline) is captured in high detail by cameras.
The fix: Use the minimum coverage necessary:
- Start with light coverage and build only where needed
- Blend thoroughly especially around the nose, jawline, and hairline
- Extend foundation slightly onto the neck to avoid a visible line
- Use a damp beauty sponge to press foundation into skin rather than wiping it on
- Allow foundation to set before adding additional layers
- Choose formulas appropriate for photography — some foundations are specifically designed to photograph well
Professional makeup artists often use less foundation for photos than for in-person events because cameras require a more natural approach.
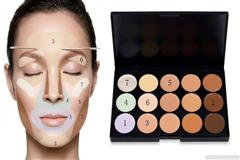
Overdone Contouring
Instagram-style contouring with dramatically dark shades can look striking in person and on social media (where filters soften the effect), but it photographs harshly in professional settings. Strong contour lines that appear sculptural in real life often look like dirt or bruising in photos taken with proper lighting.
Why this happens: Contouring relies on lighting angles to create the illusion of shadow. Professional photography lighting is designed to eliminate unwanted shadows, which means your contour is fighting against the lighting setup. The result is obvious makeup rather than enhanced features.
The fix: Use subtle, well-blended contour:
- Choose contour shades only 1-2 shades darker than your natural skin tone
- Blend extensively until there are no visible lines or edges
- Apply contour where shadows naturally fall on your face shape
- Use a light hand — you can always add more but removing excess is difficult
- Consider skipping contour entirely for close-up beauty shots where lighting does the sculpting
Wrong Blush Placement
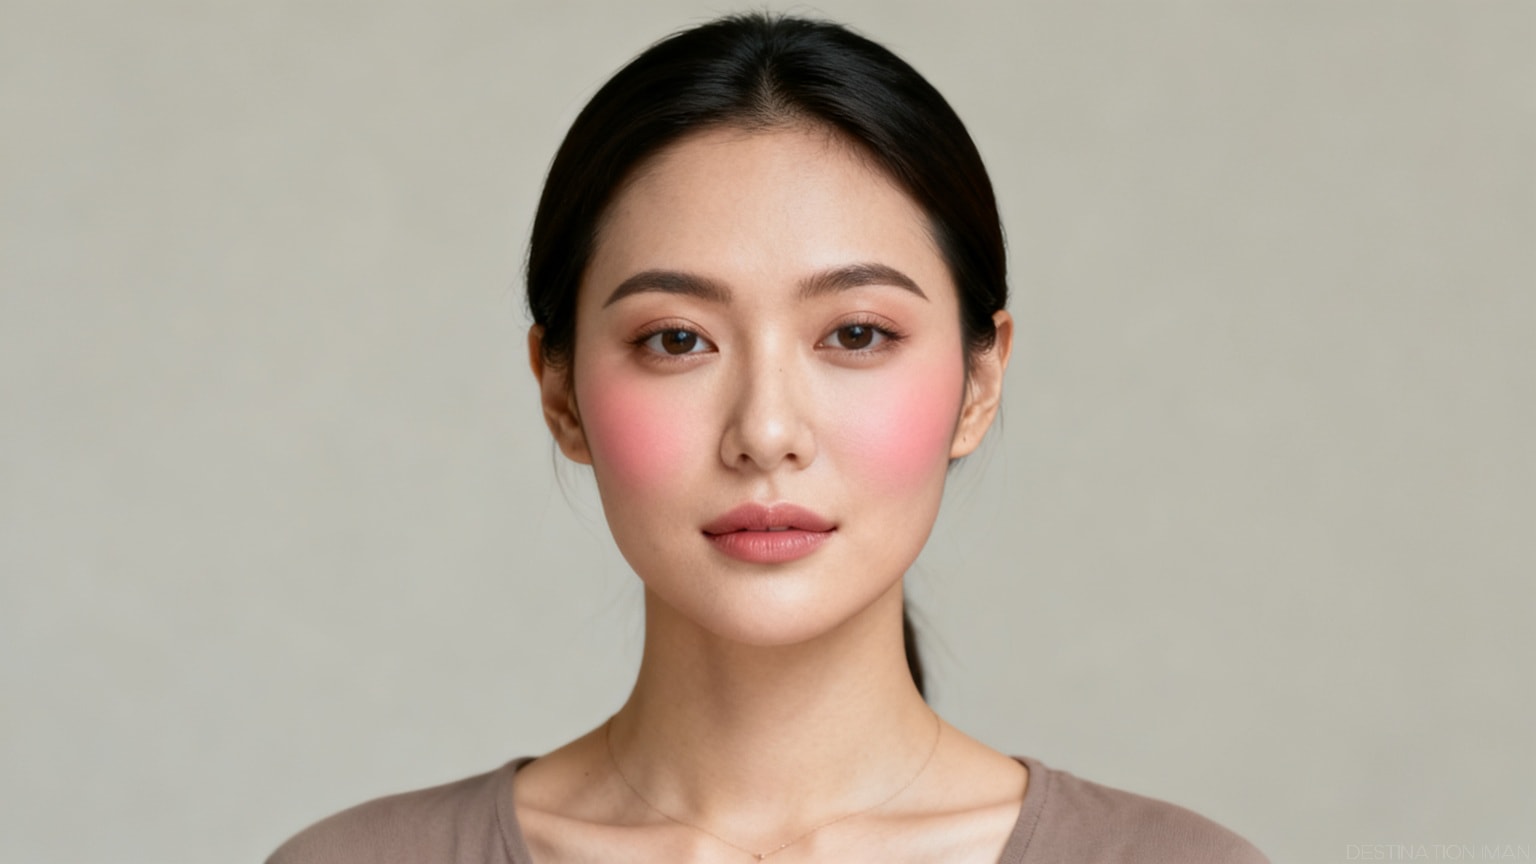
Blush placement dramatically affects how your face photographs. Incorrect placement can make cheeks look sunken, the face appear wider, or create an unbalanced look that distracts from your features.
Why this happens: Social media trends encourage blush placement that works for selfies taken from above (where blush high on the cheeks looks good), but these same placements photograph poorly from eye level or below, which is how professional photographers typically shoot.
The fix: Adapt blush placement to your face shape and the camera angle:
- For most face shapes, apply blush on the apples of the cheeks and blend upward toward temples
- For round faces, keep blush higher on cheekbones to add length
- For long faces, apply blush slightly lower and wider to add width
- Blend thoroughly so there are no harsh edges
- Use a lighter hand than you would for daily wear — cameras intensify color
Overly Dark or Unbalanced Eye Makeup
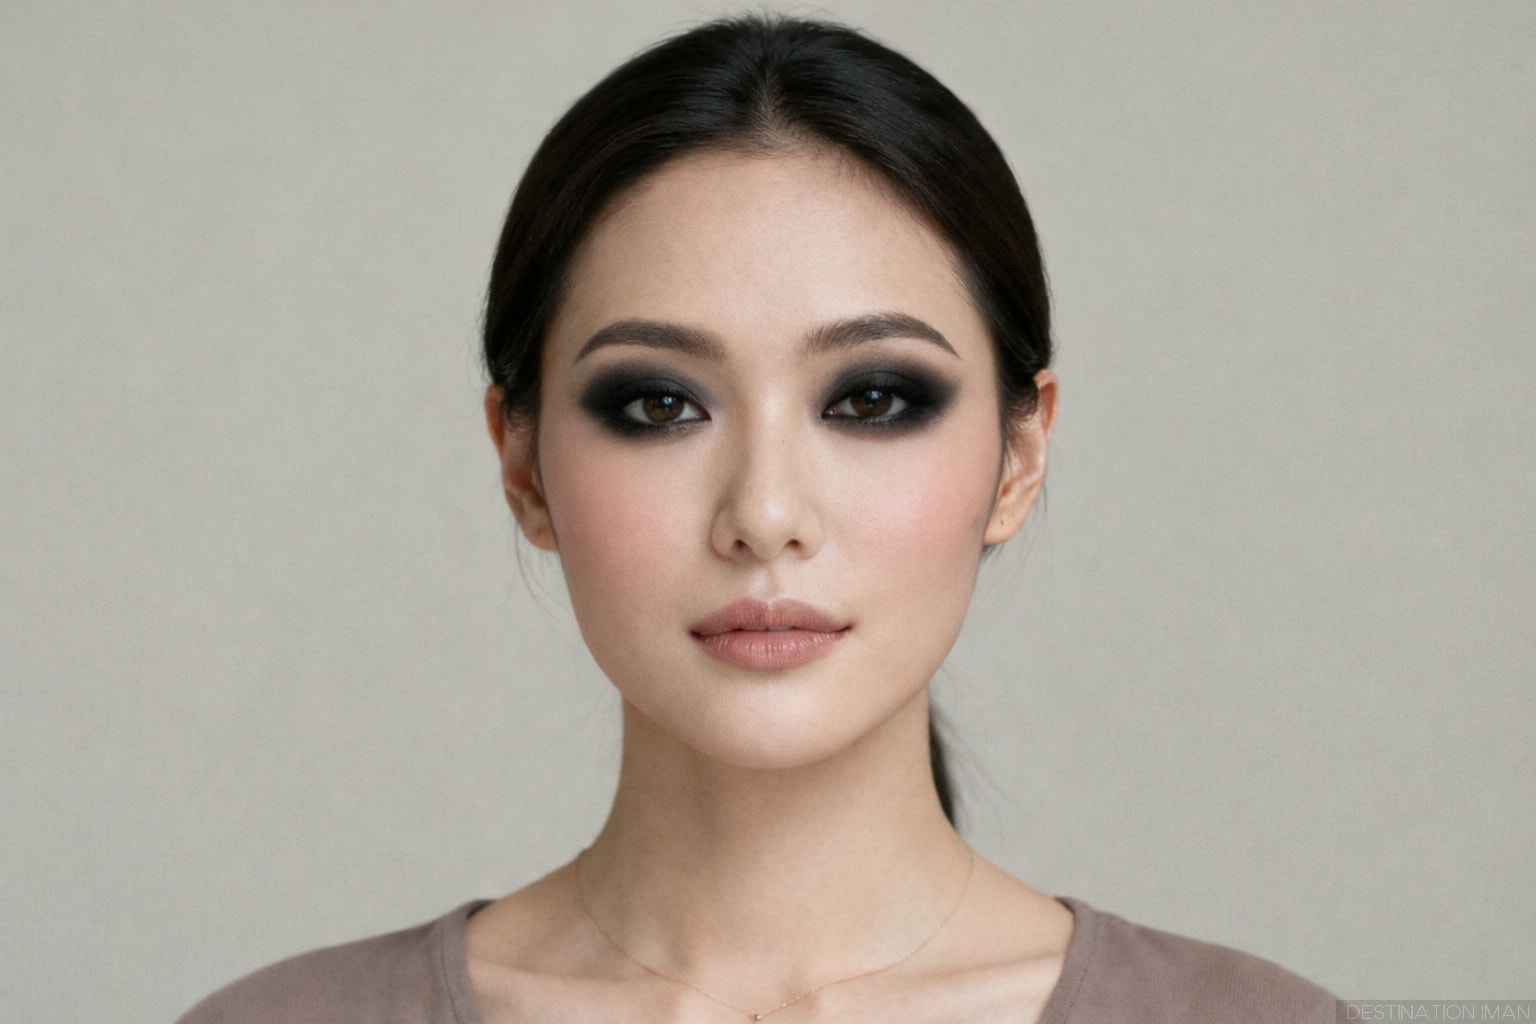
Heavy eye makeup can overpower facial features in photos, especially in beauty or portrait shots where the face is the primary focus. Eyes should enhance your expression, not dominate the entire image.
Why this happens: Dark eyeshadow creates shadows that cameras capture as black voids, making eyes appear smaller and more closed off. This effect is amplified by certain lighting setups.
The fix: Balance eye makeup with the overall look:
- Use transition shades to blend harsh lines
- Keep the darkest colors in the outer corner rather than across the entire lid
- Add a light shade to the inner corner to brighten and open eyes
- Consider the lighting setup — bright studio lighting requires more definition than outdoor shots
- Balance eyes with lips — if eyes are dramatic, keep lips neutral and vice versa
Ignoring Eyebrow Balance
Eyebrows frame the face and are one of the first features people notice in photos. Uneven, overly drawn, or poorly shaped brows become very noticeable in images, especially in close-up portraits.
Why this happens: We apply brows while looking straight into a mirror, but photos are taken from various angles that reveal asymmetries invisible from our straight-on view.
The fix: Create balanced, natural-looking brows:
- Use short, hair-like strokes rather than solid lines
- Keep brows softly defined not harshly drawn
- Check symmetry from multiple angles before the shoot
- Use a lighter hand on the inner brow to avoid a harsh, blocky look
- Set with clear or tinted brow gel to keep hairs in place
Lip Color That Doesn't Match the Look
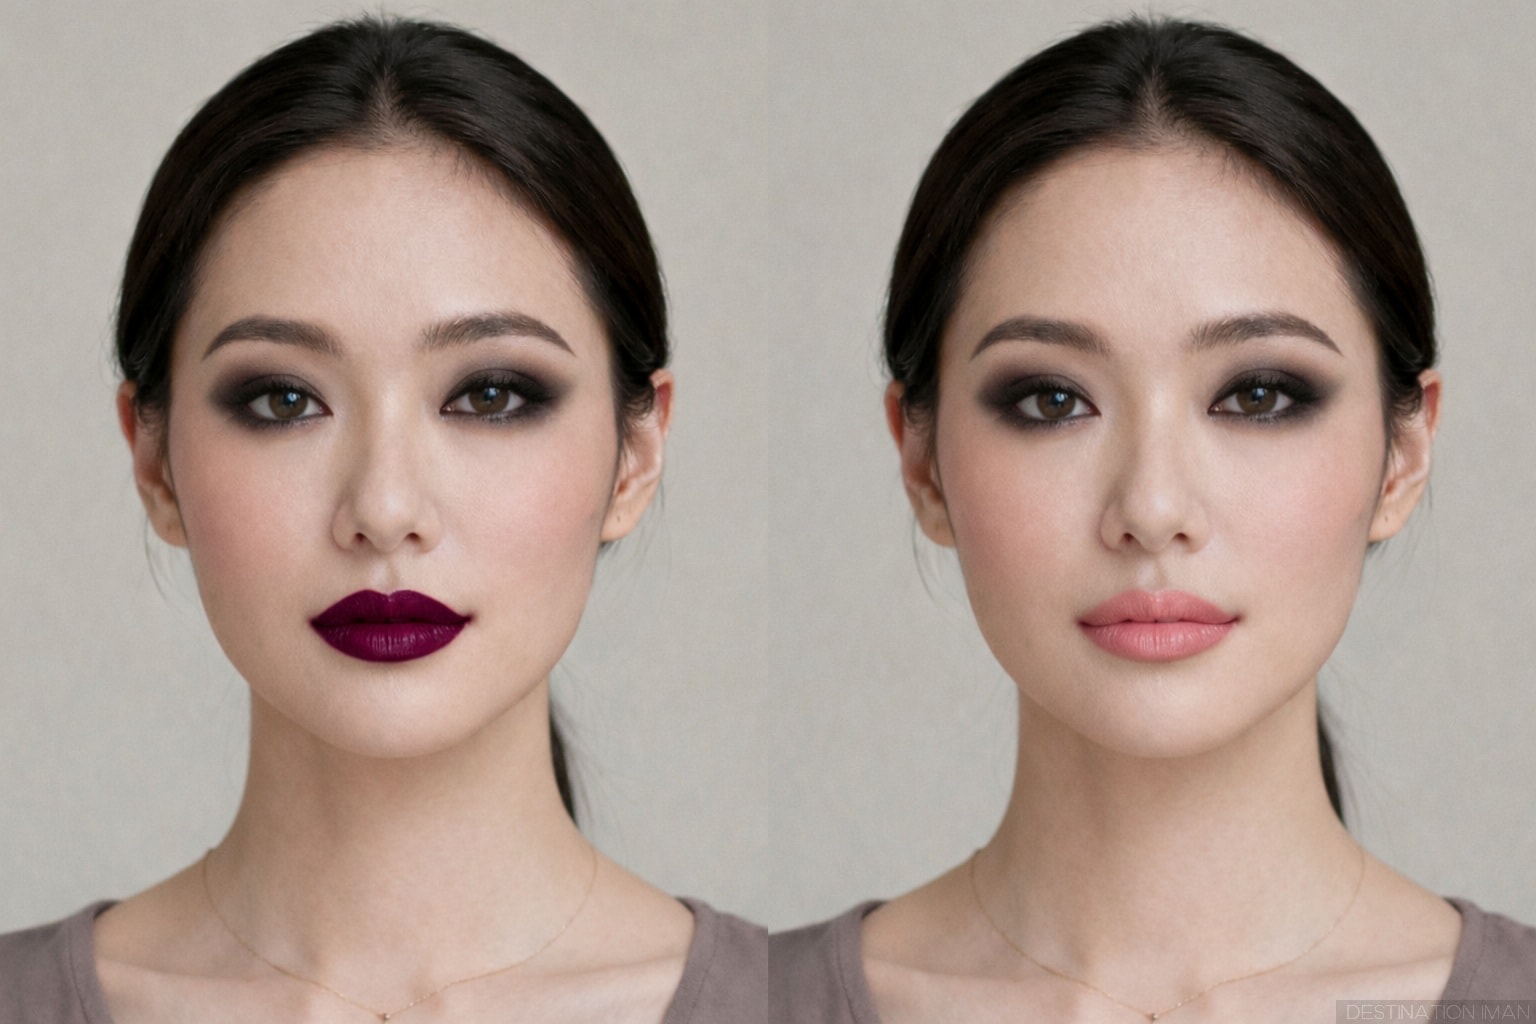
Incorrect lip color can break the harmony of the entire face. Lips that are too dark, too bright, or the wrong undertone for your look can draw attention away from a balanced, cohesive image.
Why this happens: Lip color is often chosen in isolation rather than as part of the complete look. What looks good on its own may not work with your eye makeup, outfit, and the overall mood of the shoot.
The fix: Match lip tone to the overall aesthetic:
- Coordinate with eye makeup — balanced looks typically emphasize either eyes or lips, not both equally
- Consider the outfit and setting — natural looks call for subtle lips, dramatic looks can handle bold colors
- Test lip color in the same lighting as the shoot if possible
- Use lip liner to define and prevent bleeding
- Avoid extremely matte formulas that can look dried out in photos
Expression and Posing Issues
Perfect makeup on a tense face still produces an unflattering photo. Your expression and facial posing are just as important as your makeup technique.
Poor Facial Relaxation
Tension in the jaw, around the lips, in the forehead, or around the eyes is instantly captured by the camera. Even slight tension changes how your face photographs, making you appear stressed, uncomfortable, or unnatural.
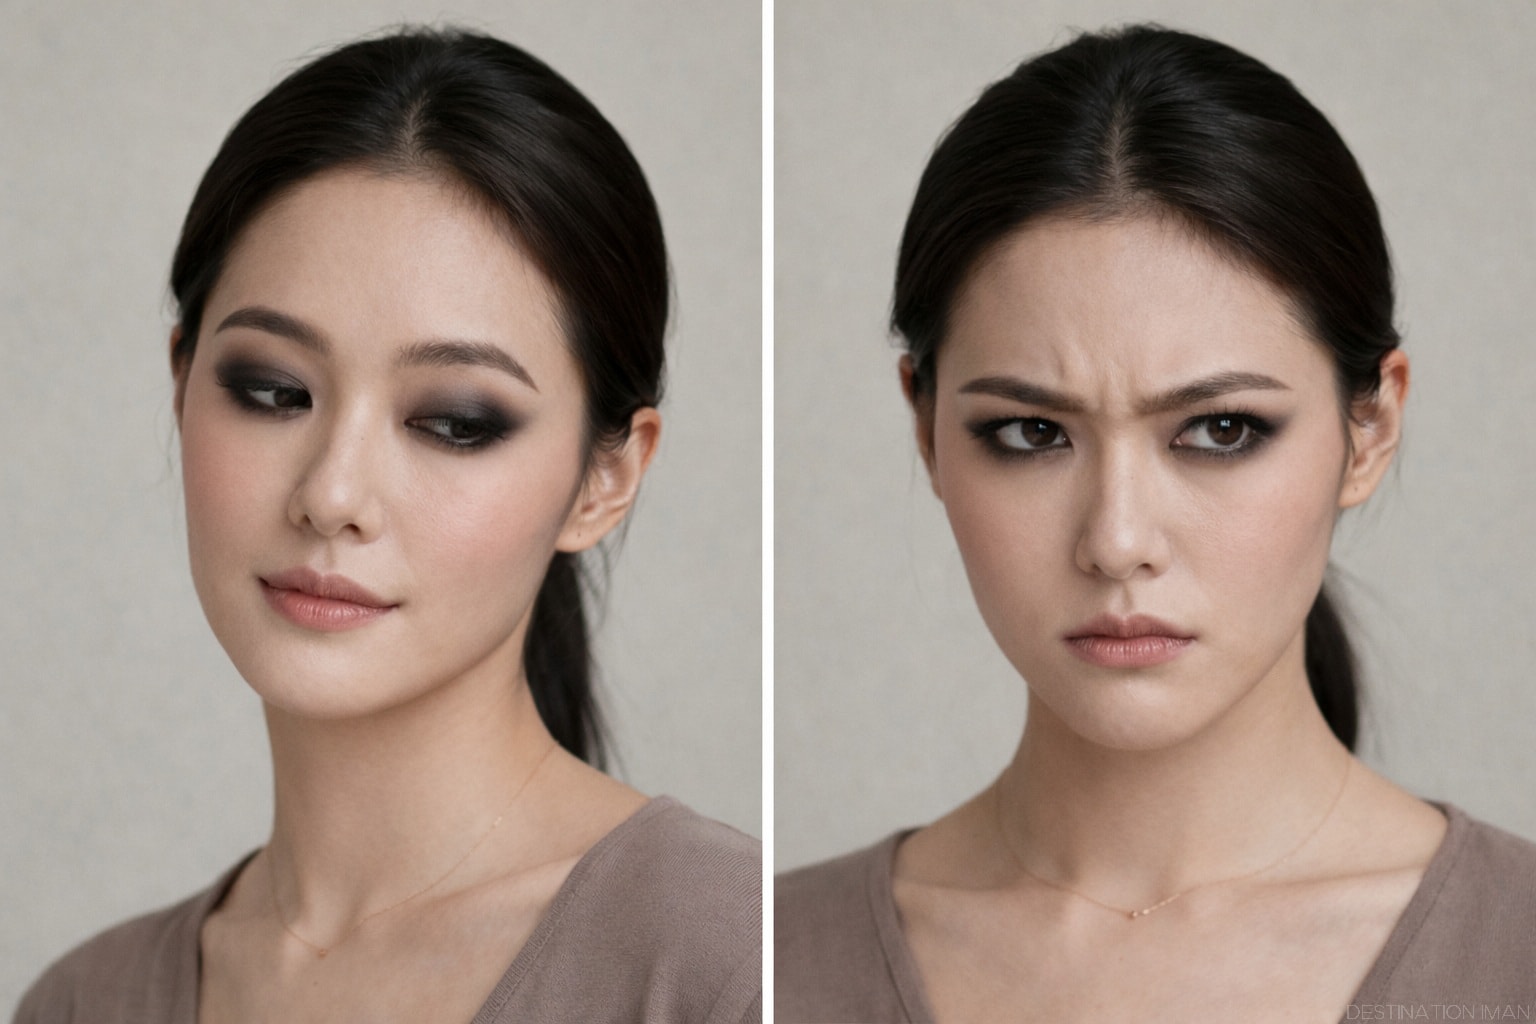
Why this happens: Being aware of the camera creates self-consciousness, which manifests physically as muscle tension. Your subconscious protective response to being photographed is to tighten facial muscles.
The fix: Consciously relax facial muscles:
- Breathe naturally and deeply — holding your breath creates tension
- Relax your jaw by slightly opening your mouth and then gently closing it
- Soften the muscles around your eyes by thinking of something pleasant
- Move between shots to prevent static tension from building
- Practice relaxed expressions in a mirror before shoots

Forgetting About Neck and Décolletage
Makeup often stops at the jawline, leaving the neck a completely different color than the face. This creates an obvious mask effect that's especially noticeable in portraits that show the neck and shoulders.
Why this happens: We focus so intently on the face that we forget the camera will capture more than just facial features.
The fix: Extend your makeup routine beyond the face:
- Blend foundation slightly onto the neck for a seamless transition
- Apply the same skincare to neck and chest that you use on your face
- Consider body makeup for shots showing shoulders and décolletage
- Check the transition in natural light before the shoot
Technical Considerations
Mismatched Makeup and Lighting
Makeup that looks perfect in bathroom lighting may fail spectacularly under studio lights or natural outdoor light. Different lighting conditions reveal different aspects of makeup application, and what works in one setting may not work in another.
Why this happens: Warm bathroom lighting is forgiving and hides many makeup application flaws. Cool daylight and bright studio lights are unforgiving, revealing every texture, color mismatch, and application error.
The fix: Prepare for the lighting environment:
- Test makeup in similar lighting to the shoot whenever possible
- Use a daylight-balanced mirror or check your makeup outside before an outdoor shoot
- Ask the photographer about lighting setup to understand if you'll be dealing with harsh or soft light
- Bring touch-up supplies and check makeup after test shots
Not Adapting Makeup to Camera Distance
Close-up beauty shots require much more refined makeup application than full-body fashion shots. The same makeup intensity doesn't work for both situations because the camera captures different levels of detail.
Why this happens: People often prepare one "photo makeup" look without considering how close the camera will be.
The fix: Adjust makeup intensity based on the shot type:
- For extreme close-ups — use minimal, perfectly blended makeup with focus on flawless skin
- For head and shoulders portraits — standard beauty makeup with balanced features
- For full-body shots — slightly more dramatic makeup so features don't disappear
- For distance shots — bolder definition so features remain visible
Relying on Filters Instead of Preparation
With the prevalence of beauty filters and editing apps, many people skip proper preparation assuming everything will be fixed in post-production. This is a mistake for professional photography where natural, authentic images are the goal.
Why this happens: Social media has normalized heavily filtered images, creating the expectation that all photos will be digitally enhanced.
The fix: Focus on real preparation:
- Proper skin prep and makeup application create better results than heavy editing
- Professional photographers typically prefer minimal retouching on well-prepared subjects
- Natural photos age better than heavily filtered ones
- Learn photography makeup techniques rather than relying on post-processing

The Philosophy of Photo-Ready Beauty
Forgetting Natural Beauty
Perhaps the biggest mistake is trying to hide everything rather than enhance what's naturally there. Attempting to create a completely different face removes character and authenticity, often resulting in photos that don't look like you at all.
Why this happens: Insecurity and unrealistic beauty standards lead people to over-correct perceived flaws.
The fix: Enhance rather than mask:
- Embrace natural features — freckles, beauty marks, and unique characteristics add personality
- Focus on skin health rather than heavy coverage
- Enhance your best features instead of trying to change everything
- Remember that perfect symmetry is unnatural and slight variations are beautiful
- Confidence shows in photos more than perfect makeup
Pre-Shoot Beauty Checklist
24 Hours Before:
- Gentle exfoliation
- Deep hydrating mask
- Extra sleep
- Limit salt and alcohol
Day of Shoot:
- Cleanse thoroughly
- Apply lightweight moisturizer (15-20 min before makeup)
- Use primer appropriate for skin type
- Color correct before foundation
- Light foundation layers, blend thoroughly
- Soft, well-blended contour if needed
- Balance eye and lip makeup
- Check makeup in natural light
- Bring blotting papers and touch-up supplies
Frequently Asked Questions
Why does my skin look worse in photos than in the mirror?
Cameras capture texture, uneven tone, and lighting imperfections with technical precision that's far more detailed than human perception. Your mirror image is also reversed (the familiar version of yourself), while photos show you as others see you, which feels unfamiliar and therefore less attractive to your brain. Additionally, cameras exaggerate texture through sharp focus and high resolution.
Is makeup absolutely necessary for good photos?
Not always, but strategic preparation significantly improves results. Even if you skip traditional makeup, skin preparation (moisturizing, priming), light color correction for dark circles or redness, and grooming (eyebrows, lips) make a substantial difference. The key is creating even-toned, well-prepared skin that photographs smoothly rather than covering everything with heavy makeup.
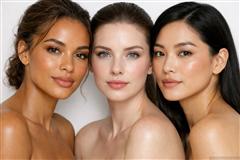
Do these beauty rules apply to all ages and skin types?
Yes, the fundamental principles apply universally, but the specific techniques should adapt. Mature skin requires hydration and lighter coverage to avoid settling into lines. Younger skin might need oil control instead. Dry skin needs extra moisture and luminous products, while oily skin needs strategic mattifying. The goals remain the same — even tone, proper preparation, and enhancement rather than masking — but the methods adjust to individual needs.
How do I know if my makeup is too heavy for photos?
Take test photos in the lighting conditions of your shoot. If you can see distinct makeup lines (foundation at the jawline, harsh contour edges, obvious eyeshadow demarcation), if skin looks flat and mask-like, or if makeup appears shinier or more textured than your natural skin, you've gone too heavy. Professional photo makeup should look invisible in photos while still enhancing features.
What's the difference between makeup for selfies versus professional photos?
Selfies are typically taken with phone cameras at close range with wide-angle lenses, overhead lighting, and often with beauty filters. This setup is very forgiving of makeup imperfections and actually requires slightly heavier application. Professional photography uses proper focal lengths (85mm+), professional lighting that reveals detail, and higher resolution — requiring more refined, subtle makeup application with perfect blending.
Should I do my own makeup or hire a professional for important photos?
If you're comfortable with makeup and understand photography-specific techniques, you can do your own. However, professional makeup artists trained in photography makeup understand exactly how products photograph under various lighting conditions, have experience with different skin types and face shapes, and can create looks that enhance features without looking heavy. For important professional headshots, portfolio work, or special occasions, professional makeup is usually worth the investment.
Final Thoughts
Most beauty mistakes in photography are not about appearance — they're about preparation, awareness, and understanding the technical differences between how human eyes and cameras perceive faces.
By understanding how cameras reveal texture, amplify uneven tone, and capture details invisible to casual observation, you can make strategic adjustments that dramatically improve how you photograph. The goal is never to create a mask or look like someone else — it's to present your natural features in a way that translates well through the camera lens.
Remember that proper skin preparation is more important than heavy makeup, subtle application photographs better than dramatic techniques, and natural beauty enhanced thoughtfully will always outperform artificial perfection. Confidence, relaxation, and authentic expression matter more than perfect makeup application.
The best photo-ready beauty routine is one that makes you feel like yourself — just a slightly more polished, camera-ready version.